 Pin it
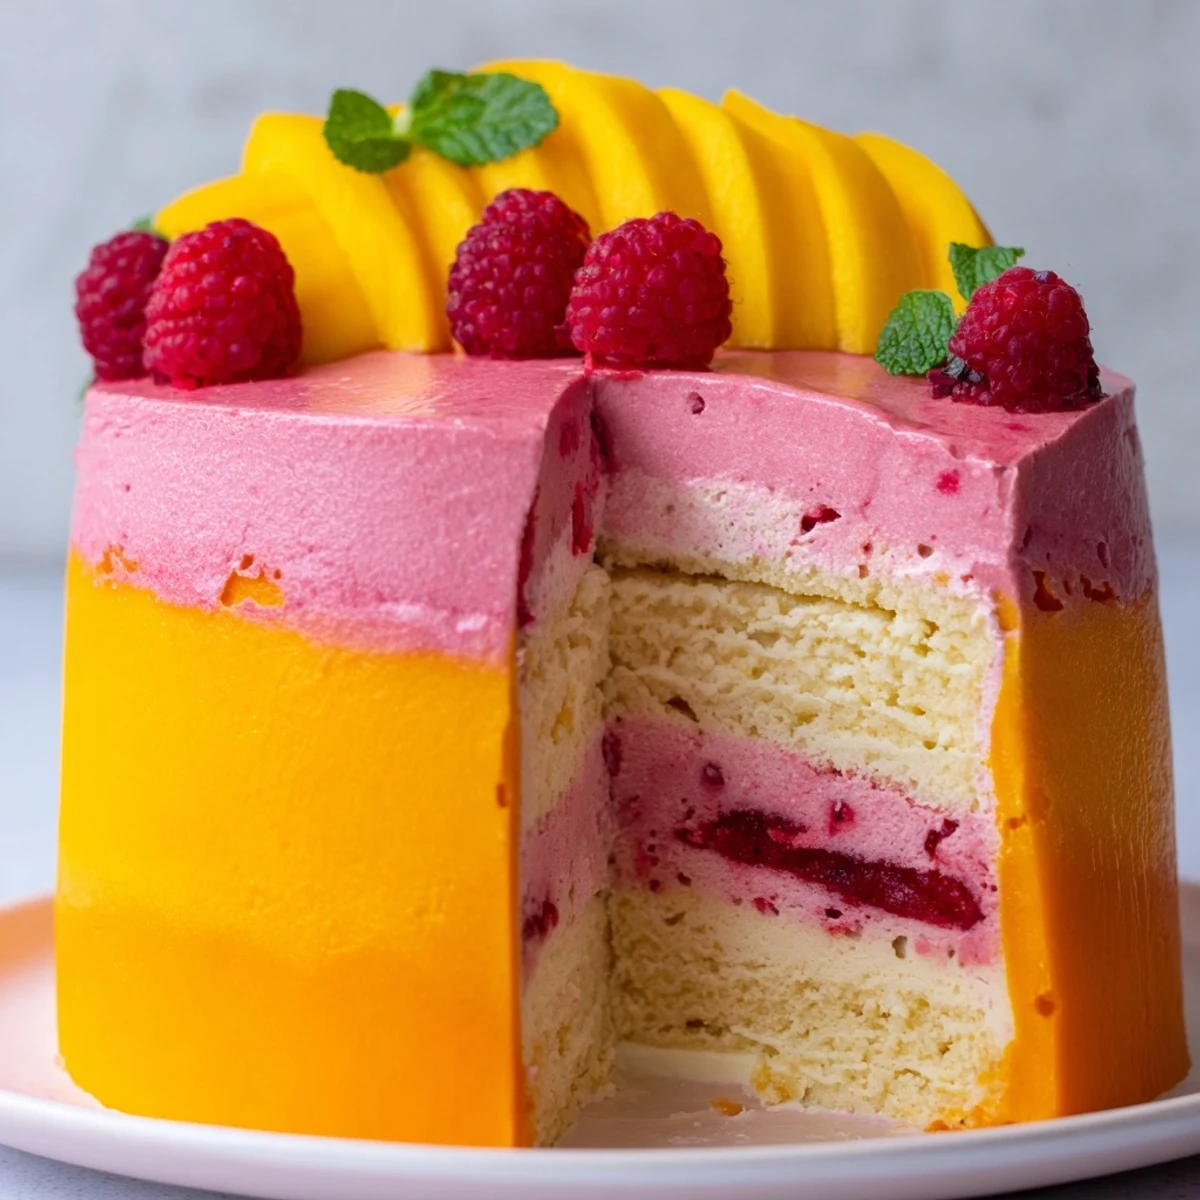
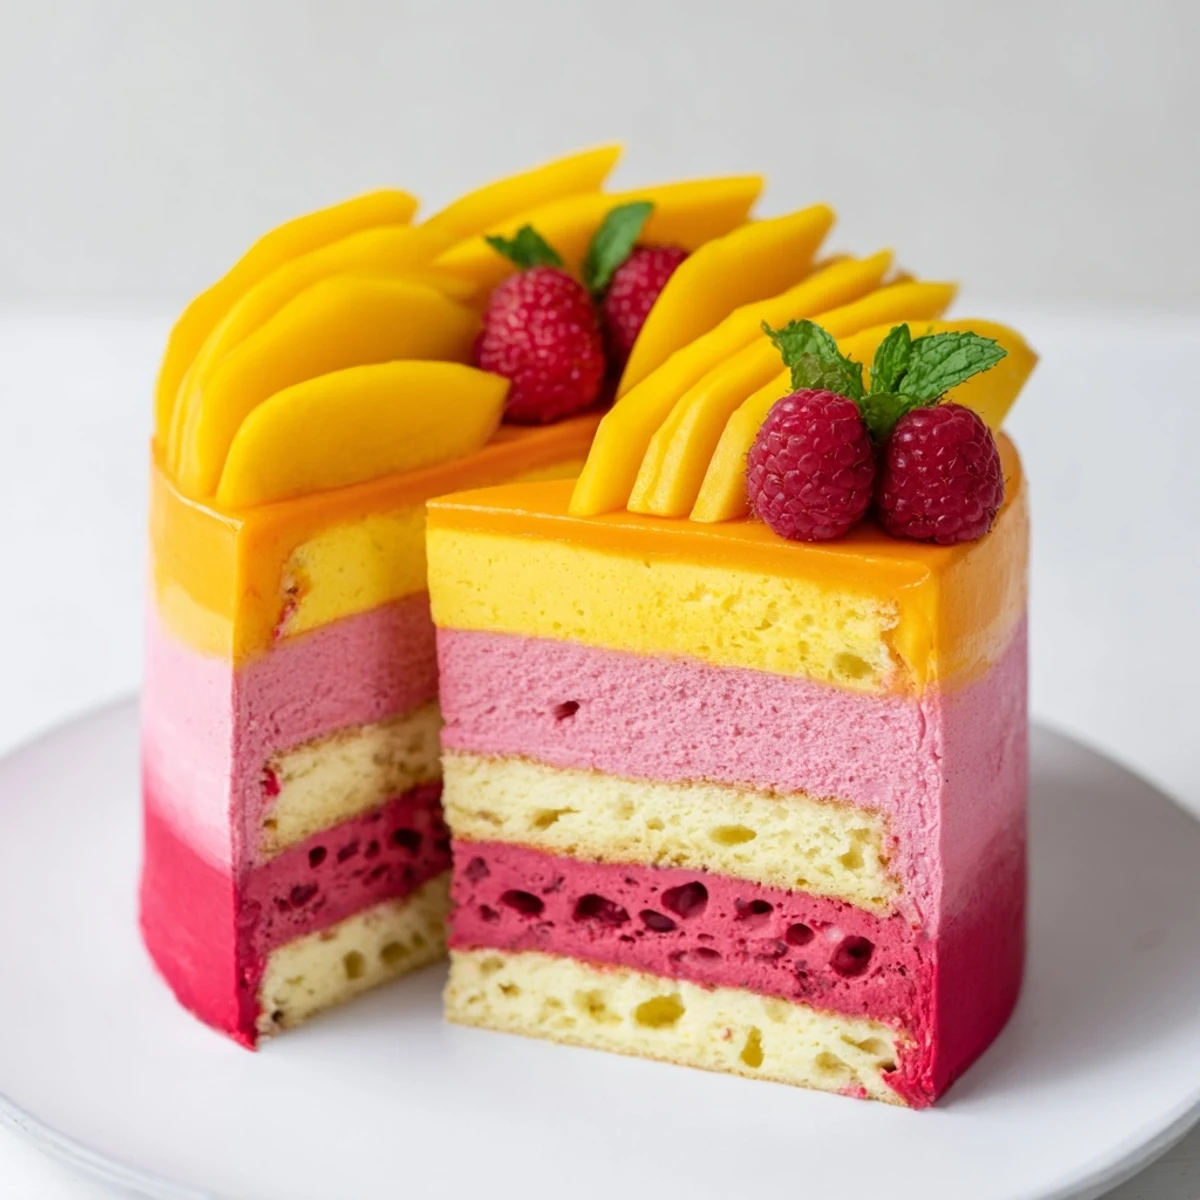
 This stunning layered dessert combines the tropical sweetness of fresh mango with the tart brightness of raspberries, all nestled on a light vanilla sponge. Each forkful delivers creamy, airy mousse that melts in your mouth, while the fresh fruit crown adds beautiful color and a refreshing finish.
The technique involves creating two separate mousses—each set with gelatin and lightened with whipped cream—then layering them over a simple génoise-style sponge base. Though the process requires chilling time between steps, the result is an impressive centerpiece that tastes as divine as it looks.
Ideal for warm weather entertaining, this make-ahead dessert needs to chill for at least 4 hours, making it perfect for preparing the day before your celebration. The texture is wonderfully light compared to traditional cheesecakes or heavy mousse cakes, and the vibrant colors make for an unforgettable presentation.
The first time I made this mousse cake, it was for my sister's birthday in late July. She had spent months talking about this dream dessert she had at a wedding, something light and tropical that just dissolved on your tongue. I spent three days obsessing over gelatin ratios and watching mousse tutorials at 2 AM. When we finally cut into it and saw those beautiful sunset layers, she actually teared up a little.
Last summer I brought this to a backyard barbecue where everyone had already stuffed themselves with burgers and chips. Within minutes of serving, plates were being passed around for seconds and the conversation at the table completely shifted to how I managed to make something restaurant quality at home. Now it is the most requested thing at every family gathering.
Ingredients
- 3 large eggs: Room temperature eggs whip up fluffier and create that cloud like sponge texture
- 90 g (¾ cup) granulated sugar: Fine sugar dissolves better into the egg foam for stability
- 90 g (¾ cup) all-purpose flour: Sift it twice to prevent any lumps in your delicate sponge
- 1 tsp vanilla extract: Pure vanilla makes all the difference in such a simple cake base
- Pinch of salt: Just enough to make the vanilla sing without tasting salty
- 300 g (2 cups) ripe mango flesh: Use mangoes that give slightly when pressed and smell fragrant
- 50 g (¼ cup) granulated sugar: Adjust this depending on how sweet your mangoes are naturally
- 2 tbsp fresh lime juice: Brightens the mango and prevents that muted tropical flavor
- 250 ml (1 cup) heavy whipping cream: Cold cream whips faster and holds its structure longer
- 6 g (2 tsp) powdered gelatin: This gives the mousse its silky set without any wobble
- 3 tbsp cold water: Sprinkle gelatin over water and let it bloom before using
- 200 g (1 ½ cups) fresh or frozen raspberries: Frozen work perfectly here since you will puree them anyway
- 50 g (¼ cup) granulated sugar: Taste your raspberry puree and add more if needed
- 1 tbsp fresh lemon juice: Essential for making the raspberry flavor really pop forward
- 200 ml (¾ cup + 2 tbsp) heavy whipping cream: Keep this ice cold until you are ready to whip
- 5 g (1 ½ tsp) powdered gelatin: Slightly less than mango layer since raspberry puree is thinner
- 2 tbsp cold water: Cold water activates the gelatin properly every time
- Fresh mango slices: Cut them thin and fan them for that professional finish
- Fresh raspberries: Pick the most perfect ones you can find for the top
- Mint leaves: Tuck these around the fruit for a hit of garden fresh color
Instructions
- Prepare your pan and preheat:
- Line your 23 cm springform pan with parchment paper on the bottom and preheat the oven to 180°C (350°F). The parchment paper is essential because this delicate sponge will tear if you try to remove it without protection.
- Whip the eggs into clouds:
- Beat those room temperature eggs with sugar for a full 5 minutes until they have tripled in volume and look pale and glossy. You are looking for that ribbon stage where the batter falls back on itself in thick folds.
- Fold in the dry ingredients:
- Gently sift the flour over your egg mixture and fold it in with a rubber spatula, being careful not to knock out all that precious air you just whipped in. Add the vanilla and salt right at the end.
- Bake the perfect sponge base:
- Pour the batter into your prepared pan and bake for 12 to 15 minutes until the top is golden and springs back when you touch it. Cool it completely in the pan because this thin cake is too delicate to move while warm.
- Bloom the mango gelatin:
- Sprinkle the gelatin over cold water and let it soften for about 5 minutes while you work on the fruit puree. This step is crucial because lumpy gelatin will ruin your silky smooth mousse texture.
- Create smooth mango puree:
- Blend the mango with sugar and lime juice until absolutely no chunks remain. Heat it gently in a saucepan just until warm, then stir in the bloomed gelatin until it completely disappears.
- Whip the cream to perfection:
- Whip your cold heavy cream until it holds medium peaks, which means when you lift the whisk it should curl over gently but not be stiff. Over whipped cream will make your mousse grainy instead of velvety.
- Combine and layer the mango mousse:
- Fold about a third of the whipped cream into the cooled mango mixture to lighten it, then gently fold in the rest. Spread this gorgeous sunshine colored mousse over your cooled sponge and refrigerate for 30 minutes until set.
- Prepare the raspberry layer:
- Repeat the blooming process with the raspberry gelatin, then puree the raspberries with sugar and lemon juice. Strain this through a fine mesh sieve to remove all those tiny seeds that would ruin the silky texture.
- Complete the raspberry mousse:
- Warm the raspberry puree, dissolve the gelatin, and let it cool to room temperature. Whip the cream to medium peaks and fold it in gently, then spread this vibrant pink layer over the set mango mousse.
- Set until perfectly firm:
- Refrigerate the cake for at least 3 hours or overnight if you want to be completely stress free before serving. The layers should feel firm and jiggly, like proper set mousse should.
- Decorate like a professional:
- Run a thin knife around the edge of the pan and release the springform ring. Arrange fresh mango slices and raspberries on top, tuck in some mint leaves, and serve this showstopper immediately.
 Pin it
 My mother in law asked for the recipe after taking one bite and I honestly felt like I had passed some kind of unofficial test. Now every time I see mangoes and raspberries in the grocery store, I think about how something so fancy looking can actually be so straightforward to make at home.
Making It Gluten Free
I have made this with a 1 to 1 gluten free flour blend and honestly nobody could tell the difference. The key is sifting the gluten free flour twice because it tends to clump more than regular flour. Your sponge might be slightly more delicate, but the mousse layers do all the heavy lifting for structure anyway.
Working With Gelatin
After several failed attempts where my mousse turned into soup, I learned that gelatin is surprisingly picky about temperature. If your fruit puree is too hot, it can break down the gelatin, but if it is too cool, the gelatin will set into strings before you can mix it in. Room temperature is the sweet spot where everything blends into silky perfection.
Make Ahead Magic
This cake actually improves after resting in the fridge overnight because the flavors have time to meld together and the texture becomes even smoother. I love making it the day before a party because it means I can focus entirely on other dishes while knowing I have a show stopping dessert ready to go.
- Wrap the springform pan loosely with plastic after the first layer sets to prevent any fridge flavors
- Let the cake sit at room temperature for 10 minutes before releasing the pan for easier removal
- Decorate right before serving because fresh fruit can weep and make the top look less perfect over time
 Pin it
 Every time I serve this, someone asks how long it took and I honestly smile because the active work is so minimal. This is one of those recipes where doing things in the right order matters more than effort, and the payoff is absolutely worth every minute of chilling time.
Recipe FAQ
- → Can I make this mousse cake ahead of time?
-
Absolutely! This dessert actually benefits from being made 1-2 days in advance. The flavors develop and meld during chilling, and the texture becomes more stable. Store covered in the refrigerator and add fresh fruit decoration just before serving.
- → What if I can't find fresh mangoes?
-
Frozen mango chunks work beautifully—simply thaw and drain any excess liquid before pureeing. Alternatively, high-quality store-bought mango puree can be substituted, though you may want to adjust the sugar slightly depending on the brand's sweetness.
- → Can I use frozen raspberries instead of fresh?
-
Yes, frozen raspberries work perfectly for the mousse layer. Thaw them completely and drain well before pureeing. For the decoration, however, fresh raspberries are recommended as frozen ones become too soft and watery once thawed.
- → How do I know when the gelatin is properly dissolved?
-
The gelatin is dissolved when you can't see any granules and the mixture is completely smooth. Gently heat the fruit puree (don't let it boil), add the softened gelatin, and stir constantly for 1-2 minutes until clear. Run a spoon through the mixture—if it looks uniformly glossy, you're good to go.
- → Why did my mousse separate or become grainy?
-
This usually happens when the gelatin mixture is too hot when folded into the cream, or when the mixture isn't cooled to room temperature before combining. Always let your fruit puree cool until it feels barely warm to the touch, then fold gently in one direction until just incorporated.
- → Can I make this gluten-free?
-
Certainly! Simply replace the all-purpose flour in the sponge base with a 1:1 gluten-free flour blend containing xanthan gum. The texture remains virtually identical, and those with dietary restrictions can still enjoy this elegant dessert.
